Sunday, June 24, 2012

St. Augustine
All photos were taken either with my iPad or iPhone.   
Background Photo: Photogene> Black and white filter> high contrast.
Lighthouse Photo: Sunsetter App>orange and blue 
then Lensflare App>Diffraction
Tower and Cannon: Sunsetter App (Tower was masked and merged with original to retain color of tower in Photo Wizard App)
Sailboat and St. Augustine Poster "stamp" from Dover Publications 
Page put together with text added in Montage Magic.
Other photos were used as is or gently improved in Photo Wizard App.
Questions welcomed.

Thursday, June 21, 2012


This is a photo taken on the Vegas strip.  I ran it through the updated app called Photo Tropedelic. They not only updated the app to have editing capabilities they added a section where you can run the photo through the app with your own colors.  It's an extra 99 cents, but well worth it.
   The top right corner photo was also run through the percolator app afterwards.  So many apps, so little time.

Wednesday, June 20, 2012

How to use Lettering Delights on your iPad

I am using an iPad 3, so I have no idea if this will work on a 1 or 2.
But, it works great on a 3 as long as you have the 2 apps mentioned in the instructions.


I have tried the save button several times, I either get nothing or I get a nice photo of the save button.
If you do hit the save button by accident just wait a second or two,  a very large photo of the graphic will come up.  You can hold your finger down on that and the same tab will come up as described on the next panal.
It may open as a png file in other programs, I have only tried a few and Montage Magic is the only one that I know imports png files.  And, it's a pretty good app for scrapbooking.


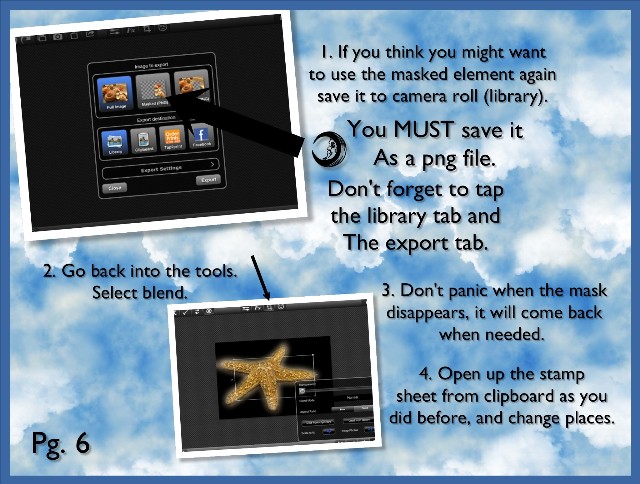
It's very important that you tap the Masked png file button or all your work will be lost.  Also, don't forget to tap Library AND Export.  (Don't sigh at me saying the obvious, I've done both).

Ok, Now if you want to download your true type Fonts and Dingbats to use in Montage Magic.

All of my true type fonts have shown up at the bottom of the list.  They have a little red circle beside them.
When you go to add some text to your Montage Magic page, there is a button on the text page that allows you to toggle between the programs default fonts, and your own downloaded ones.  If you want to preview what your font or dingbats look like, go into the Saved Collages tab (top left). At the bottom of the page is a My Fonts tab, go there and you can preview your fonts.


Note:  I have not as yet been successful in getting any of the paper pages to download onto iPad. 

Monday, June 18, 2012

Faux Stamp Collage "step by step"

       Larger Photo Below.
iPad Programs needed for this:
              Montage Magic
              Photo Wizard

All panels in this tutorial were put together
with Montage Magic.

All work was done on the iPad.


Just a note camera roll is called Library in Wizard.
    ERROR: Program is Montage Magic not Photo Montage.
If you need to have your photo hang off the edge of the stamp a little to fit, it's ok,  if it's on an outside edge as they will be cropped and reapplied, but keep the inside white dotted edges clear. 
Make sure you save stamp to clip board after added every photo or you will lose your last work.  You can only bring in a second photo or element when you are in blend mode.
If you get tired and quit for a while save your work to the clip board and to the the library just in case. 
 For this type of collage the edges don't have to be perfect.  So it's a good project to practice with.
When a masked object is moved into the blend program the mask will completely disappear.  When you move it to the top of the stamp it will come back.  If you open up a saved png file the edges will appear black until they are placed ontop as well.  They also look black saved, but if you open it into any program that supports png files it will be clipped.  
The postal dingbats are easy to find.  Just go any to any internet search engine and search Dead letter office ding bats.
They are free.  When you hit download the iPad will offer to download in Montage Magic, just say yes.  It will be there to use. There is also a couple other postage dings under other names.
Once you are done, save it to library and crop it in any program and it's ready to use.

Sunday, June 17, 2012

A "Me" Faux Stamp Collage

Today, I ran across an old page of Faux stamps which I had made with Adobe years ago, and wondered if they could be duplicated on my iPad.  I think I actually like these better.
The stamp bases were made in Photo Wizard (the more I use that program the more I like it) and Montage Magic was used to put the 4 stamps together and to add the finishing touches on them.  It took most of the day to get used to the masking and blending sections in the Photo Wizard program but I learned a lot.  I will start working on a "Play by Play" to making these stamps tomorrow. 

Saturday, June 16, 2012

Planet Ocean

I don't do a lot of Collages, and this one just sorta happened.  I was actually making a background page for some dolphin photos I took, and it got away from me.  There was no cheating it was all done on my iPad.
   1. Started with an ocean picture I took in Hawaii. Brought it into Photo Wizard and added FX Light Bokeh #3.  Then ran it through the blueish color preset. I opened FX pattern boarder and put on the boarder 2 to get the foaming effect around the edges.
2.  I copied what I did so far on to the Photo Wizard clipboard and opened up my photo of the dolphin.  I took it into the masking section (still in P.W.) and cleaned away all the background and part of the tail, then softened the edges. I saved my cropped dolphin into my photo stream.
3. Then,  I went into crop section>blend (I know that the crop section is a weird place to have the blend effect but that's where it is) and opened the page back from the clipboard, I exchanged the two photos places (it's a tab right on the tool bar) and arranged and sized the dolphin then saved that page onto the clipboard.  (Saving it makes it possible to bring in more dolphins) so still in blend, I brought in another dolphin over and over until I had 5.
4.  I cloned a little foam to cover up the ends. (Clone tool is also in crop tab, all the way at the bottom).
5. I saved it both to my photo stream (just in case) and to the clip board. I then brought in the shells and starfish, masked them out and added them to the collage.
6. There was a little background shadow that looked like a mermaid so I thought why not? I found a mermaid, brought her in and masked her out, added her to the collage (in blend) and faded her out to almost nothing.
7. Saved the page and took it into Photogene.  I added the inner Gloss in very transparent white and added a boarder.
8.  Typed in the quote and my name.  Added the circles.  Actually, did a tiny bit more cloning of sea form around a few bits and pieces.  All done.   Took about two hours, but I hadn't used the masking tool in Photogene before so some of that time was learning. It got easier.

Using Photogene

Photogene by Mobil Pond LTD is a great program for general photo improvement.
It also has great text properties tho a limited amount of fonts.
Photogene does have a small Q and A section if you tap on the i in the top left corner.
At last look it was $2.99.    (Pages put together with Montage Magic.)
                                                                     Use one finger to enlarge or reduce cut out area.
Clone tool is very easy to use it does take a little practice the first couple of times you almost  pull out your hair, but once you get the hang of it, it's super easy.  Just tap to place control dot.  Then move to where you want to clone.  Keep in mind that the control dot is moving, too.  So if you have only a small spot to clone from, you will need to use your finger to move the control dot, then keep going.
I love all the control you have over the colors, I hope an update will give more fonts.
More shapes would be nice, too.
I like being able to export my pages straight to my facebook and flickr pages. It even has an email option.  Scroll down for even more.   Very handy.

And here we are.  Very fast, very easy program.  Well worth the money spent.  I didn't spend any time talking about the effects, as I seldom use them, but the do have a quite a few of the most used ones and they work very well.